Quick Start Guide to Print and Ship Specific PDF's to Specific Addresses in One Simple Transaction (2 min Read)
This feature enables you to batch print specific PDF's to mail to specific people in one simple transaction using our PDF printing service!
Here's how:
1.) Create a CSV file that includes the filename of the PDF for each recipient and include each recipient's shipping address. (Sample CSV)
2.) Go to printMe1.com, click the green "Start Now" button.
3.) Select all of the PDF's from your device that are listed on the CSV and upload. You can bulk upload by selecting all at once, or upload in multiple batches if you like.
4.) If your CSV does not include the quantity, print and binding details for each PDF, choose them here for each PDF. We only print double sided. (Pro Tip: Specify these details in your CSV.)
5.) Your Details page: Input your credit card billing address. Then click "Continue to shipping".
6.) Shipping: Click "Manage CSV Addresses".
7.)Read the info on that page about formatting your CSV.
Note: The CSV data overrides any data entered prior and uses the PDF you uploaded. This example is using the quantity, print & binding details set from the CSV. Those details can be set in the user interface if the fields are left blank in the CSV, otherwise, the initial CSV data will overwrite input made from the user interface.
8.) Upload the CSV, and review the displayed recipient information, & if correct, click "Replace all shipping details with these.." and return to shipping.
Note: If you see any warning messages, here you can fix them in your CSV and re-upload it again.
9.) Shipping: If everything was correct in your CSV, just click the green "Continue to Purchase" button. If changes are needed, you can toggle through the addresses, use the gray dropdown menu to select an address, then review and edit in the display box.
10.)Review your Order: This is the itemized checkout detail and total. The site automatically calculates and displays the shipping and printing cost to each recipient.
11.) Pay and checkout. Your job is underway. Perfect!
If you have questions or need assistance with this feature, please contact us.
Read on for more information about the details of this feature.
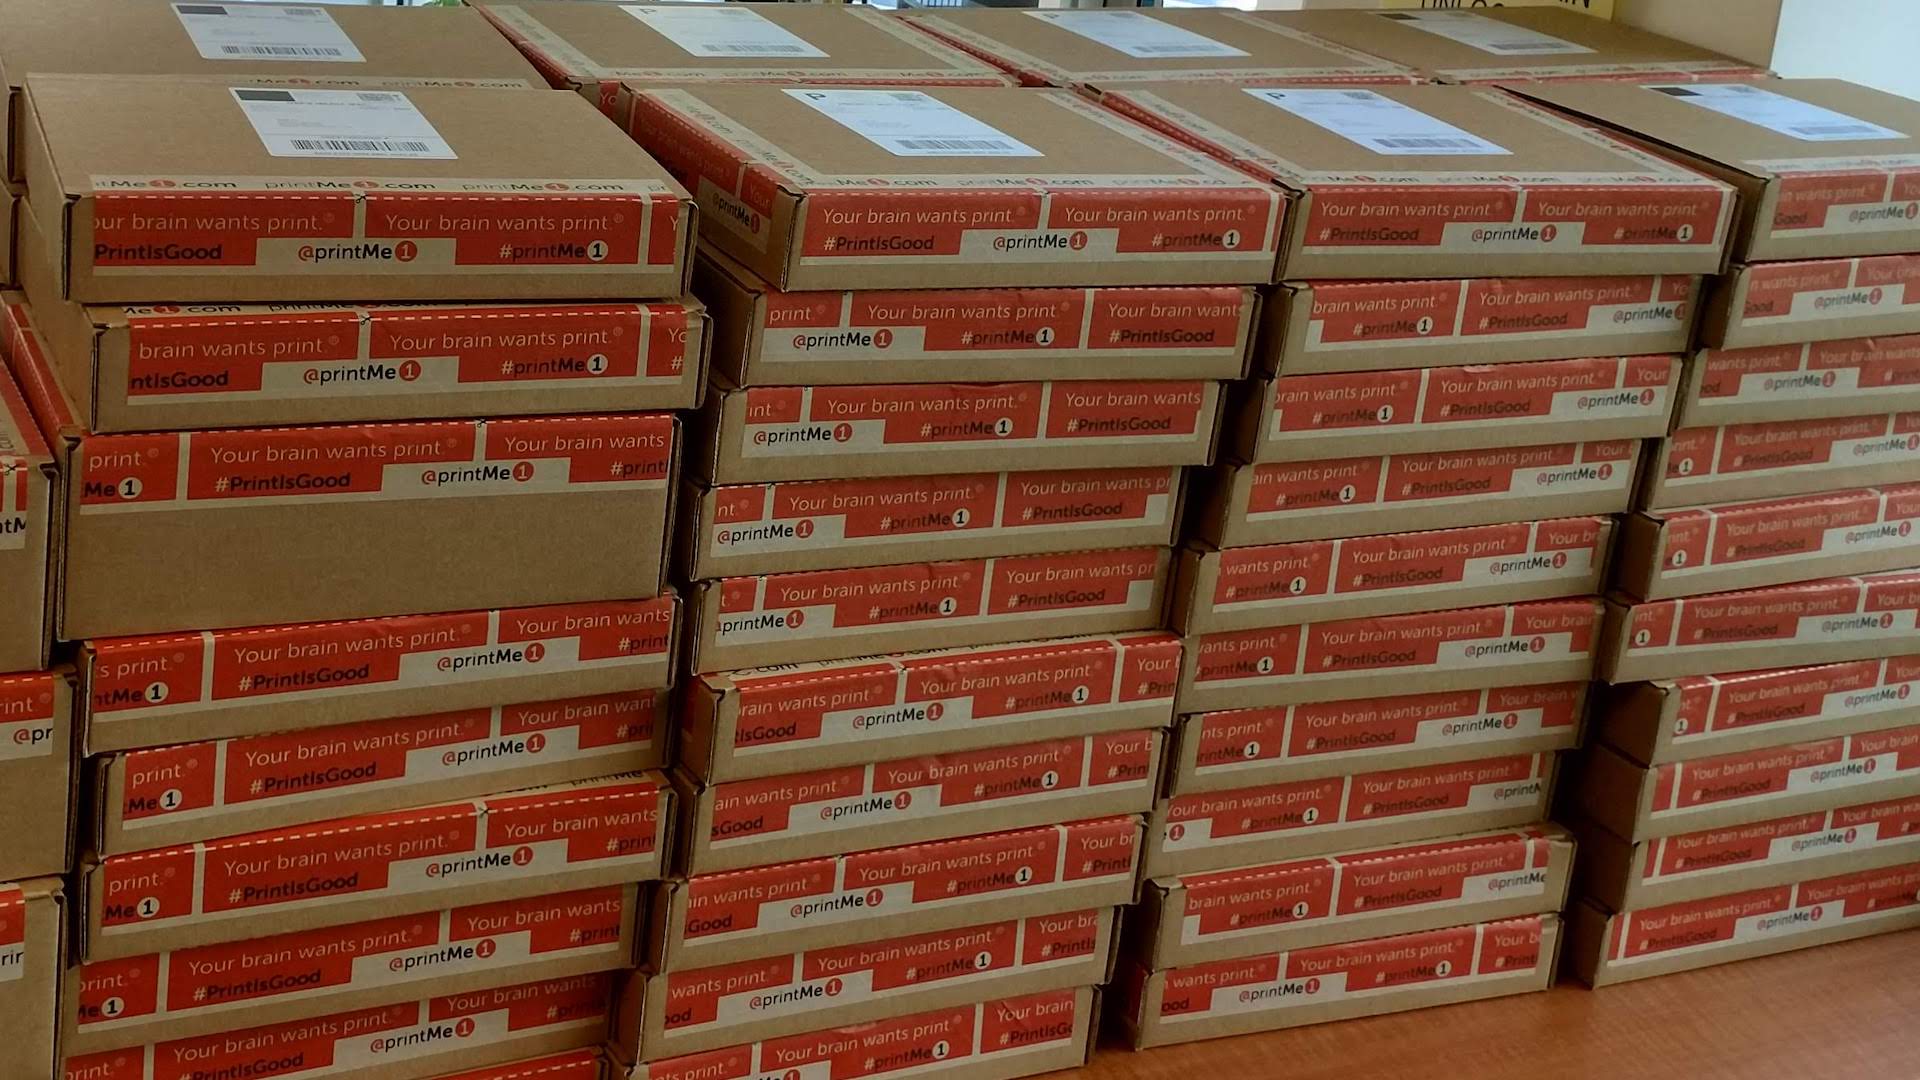
Introduction
This is another really awesome feature from the mad scientists at printMe1.com for anyone who needs to batch print specific PDF's to mail to specific recipients using our PDF printing service.
People often think something this complicated is just not possible, but those people haven't found printMe1.com yet.
Our site's simple print on demand features have some special capabilities built in that allow the print and shipping details in a normal checkout to be input through a CSV upload, instead of using the user interface. Just upload the PDF files to start, then later upload the CSV file.
Our site then calculates all of the printing, binding, and shipping costs, and provides a single total to complete the transaction.
Once payment is confirmed, our site goes to work and creates a single, specific print job for each recipient on your CSV, and processes them as if they were each individually uploaded. Jobs will ship within 48 business hours, unless the list is over 100 prints, in which case please allow an extra day per 75 prints for processing before shipping.
Use Cases for this feature include:
•Franchise manuals with location specific details
•Membership guides with specific information
•Class projects including each student's work
•Employee handbooks with personalized information
•Conference or seminar attendee documents
•Or, any similar kinds of custom printed materials that are sent to a user base all at once.
Variations of this also include sending multiple or different PDF's to members of a user base all in the same transaction. Simply specifying in the CSV the PDF each member receives, or even add multiple PDF's by adding additional rows to the same recipient.
One additional built in specialty for this feature is the ability to access stapling and folding as finishing options for batch printing low page count PDF's. We cover that in a post here.
If each recipient is receiving the same print or set of prints, this is a simpler process and called a One to Many order. We have a How To Guide to explain it here.
If you have questions or need assistance with this feature, please contact us.
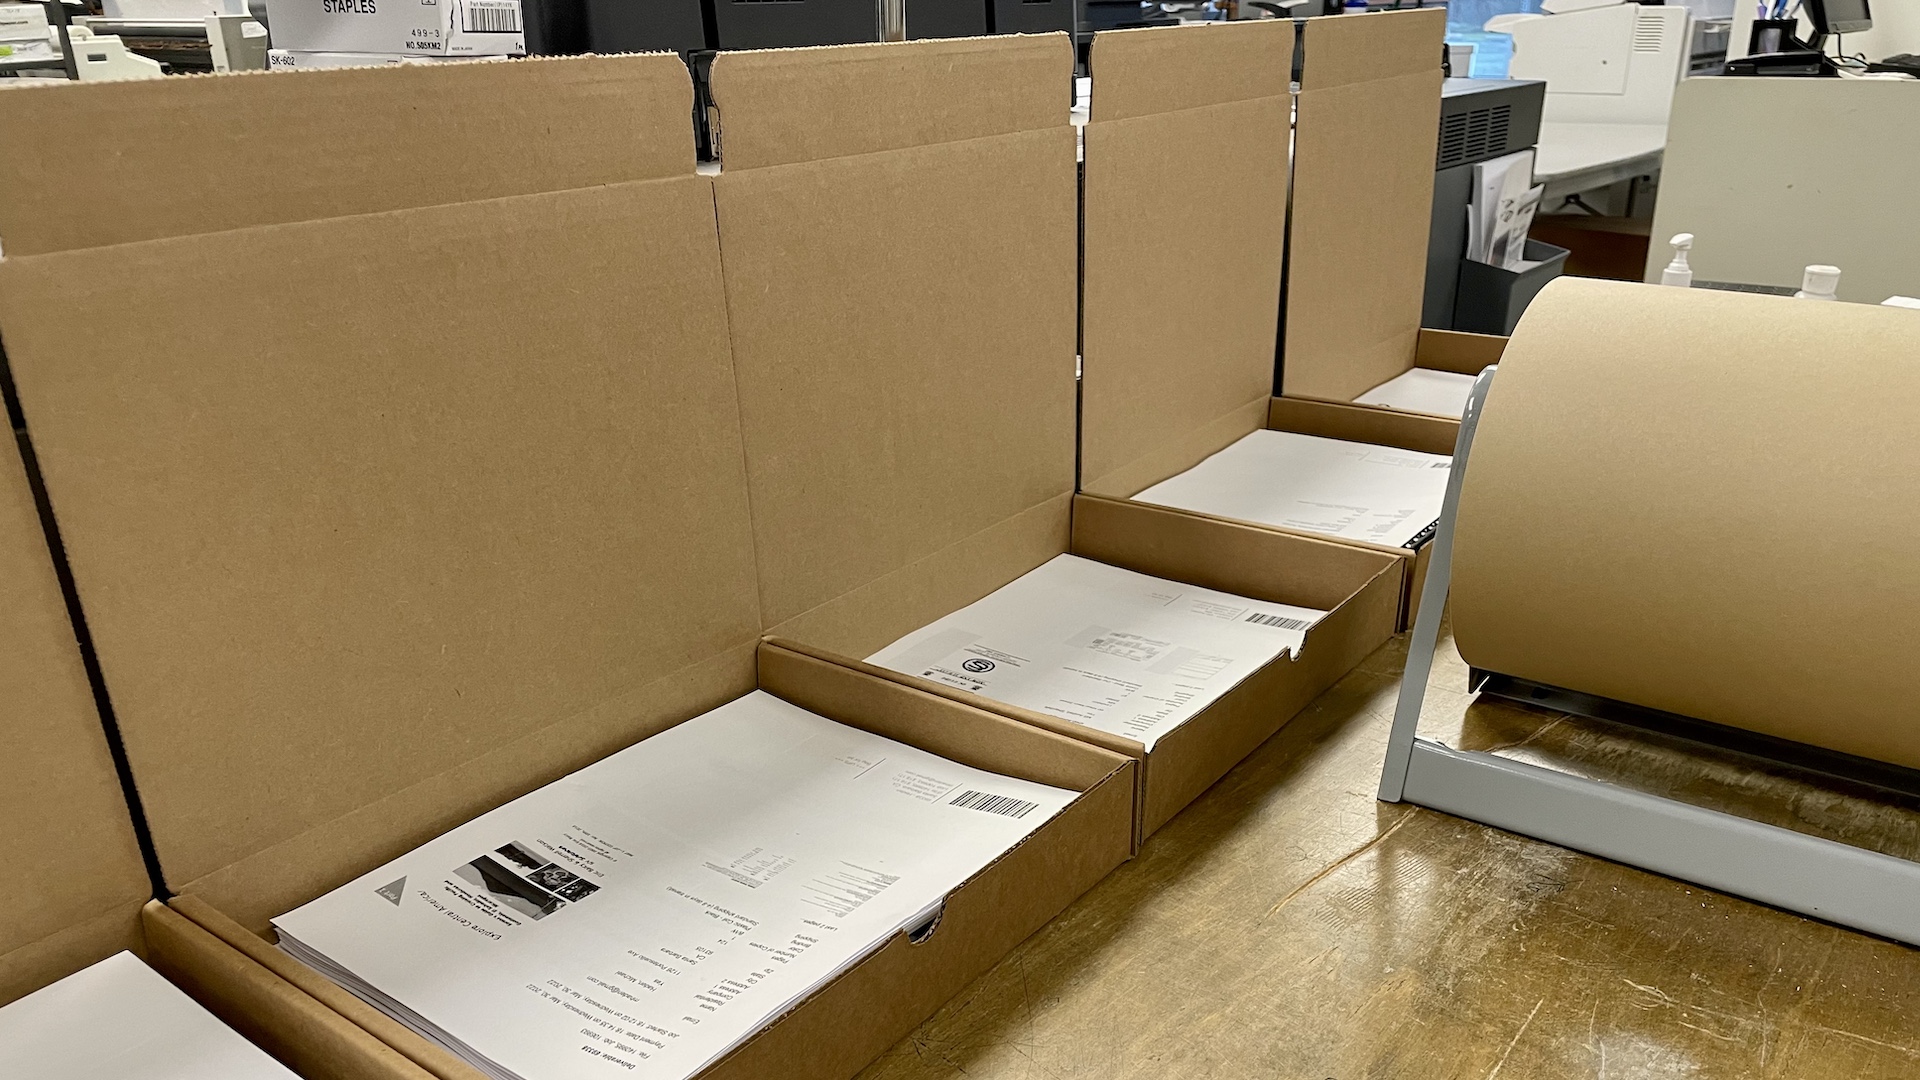
How It Works
The basic process for this feature is as follows.
First designate the filenames for the PDF's that will be printed. The PDF's all need to have different filenames. Then, collect and organize the filenames in a CSV spreadsheet along with each recipient's name and shipping address, along with the quantity, print, and binding details for each print.
Upload all of the PDF files, then later in the process, upload the CSV. The site will automatically use the CSV information to create a print and shipment for each PDF, and then check out in one simple transaction. That's it!
If each recipient is receiving the same print or set of prints, this is a simpler process and called a One to Many order. We have a How To Guide to explain it here.
Getting Started
For this feature, you'll need specifically named PDF's for each recipient, and include the PDF filename for each recipient in a row in your CSV.
CSV Spreadsheet Formatting for Specific PDF's to Specific Recipients on printMe1.com
During a specific PDF's to specific recipients order, our site will ask for a CSV file of the names and addresses, and the filename each recipient will receive in print. Here we'll show you how to format your CSV so our site accepts it.
In this example, we will be relying on the CSV to set all of the printing, binding, and shipping details, and not use the user interface to set these details.
Here is a CSV file with 6 recipients, each receiving a print of a specific PDF:

Column A
Column A above is very important for printing specific files for specific recipients.
Column A contains the specific filename to be printed for each specific recipient.
The filenames that appear in Column A must match the filenames you are uploading.
In this example, CSV above, we are using a filename for each print that matches the name of the recipient. So in row 2, the file jaygatsby.pdf is used for Jay Gatsby, in row 3, the file tombuchanon.pdf is used for Tom Buchanan, and so on. How you name your files is up to you, as long as they are all different. The site will not allow multiple uploads of the same filename to occur in the same job.
The Rest of the CSV Formatting Instructions
Each row in your CSV should represent an address.
The columns in your uploaded CSV are very important:
Each row in your CSV should represent an address. The columns in your uploaded CSV are very important, so listen carefully, I shall say this only once.
| 1 A | 2 B | 3 C | 4 D | 5 E | 6 F | 7 G | 8 H | 9 I | 10 J | 11 K | 12 L | 13 M | 14 N | 15 O |
|---|---|---|---|---|---|---|---|---|---|---|---|---|---|---|
| Filename | Quantity | Method | Binding | Shipping | Name | Phone | Company | Address 1 | Address 2 | City | State | Zip | Country |
- Column 1: The filename you wish to be sent to the address on this line (this needs to match exactly to the filename as it was uploaded to the order). If you want the address to receive all the files in the order, simply leave this blank, rather than repeat the address lots of times.
- Column 2: The number of copies to send to this address, if you leave it blank we'll set it to 1.
- Column 3: The print method to use, if different to the method chosen at upload.
- bw: B/W
- color: Color
- 1stpcolor: 1st page color
- Column 4: The binding type to use after printing, if different to the binding chosen at upload.
- 3hp: Three Hole Punch - Only available with priority shipping
- comb: Comb bind - Our standard
- coil: Plastic coil
- wire: Silver wire
- none: No binding - Only available with priority shipping
- Column 5: The Shipping Method to use, by default (if left blank) we'll use Standard Shipping, possible values are:
- standard: Standard shipping, 4-9 days in transit
- priority: Priority shipping, 3-4 days in transit
- Column 6: The full name of the recipient.
- Column 7: The email address of the recipient (for postal tracking purposes).
- Column 8: The telephone number of the recipient (for postal tracking purposes).
- Column 9: The company name at the address (if applicable).
- Column 10: The first line of the recipients address.
- Column 11: The second line of the recipients address (if applicable).
- Column 12: The town or city of the recipient.
- Column 13: The state of the recipient.
- Column 14: The ZIP code of the recipient.
- Column 15: The country of the recipient, e.g. US.
Starting a Specific to Specific™ Order
Once you have your CSV set up and ready to go, your order starts the same way as every other order in our Simple Print Service™ by clicking the green "Start Now" button.
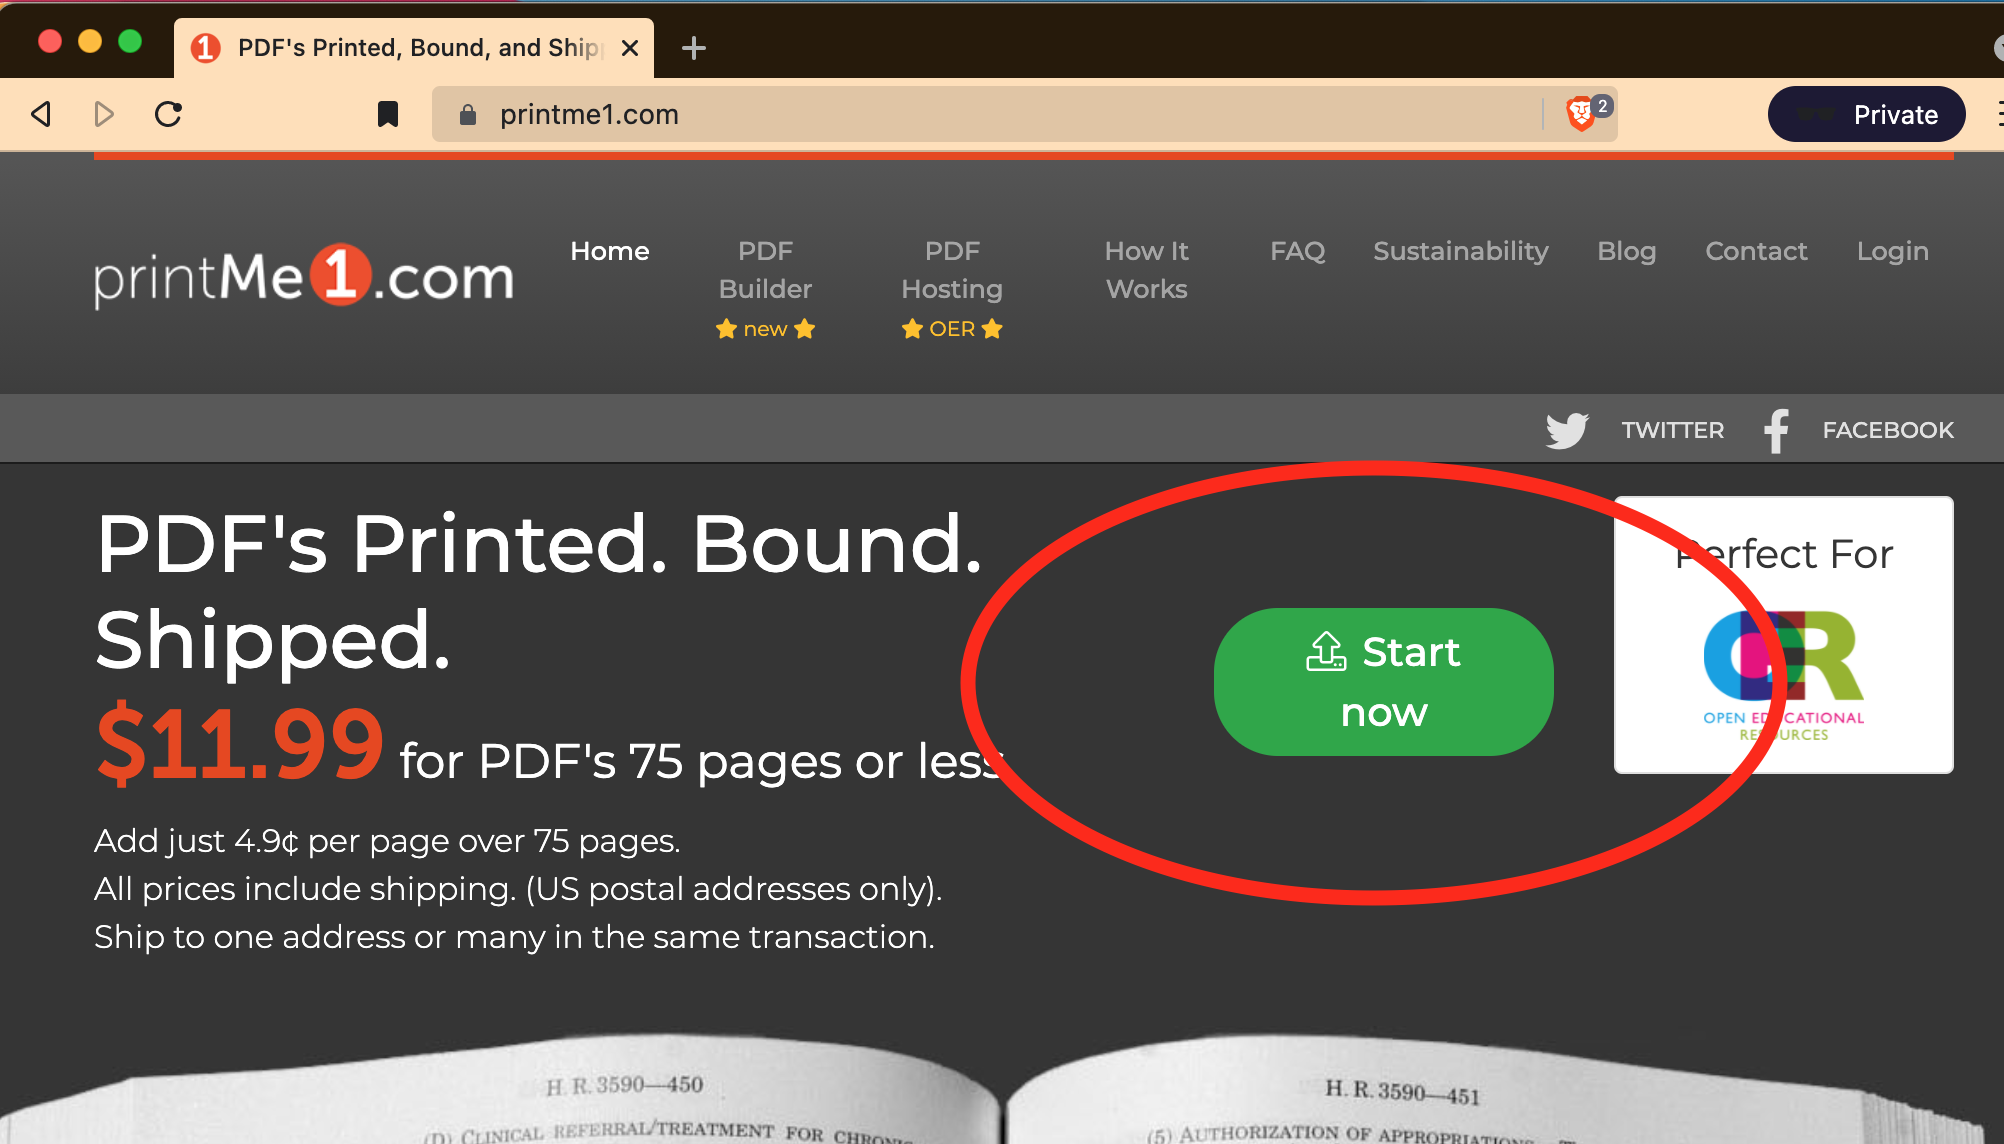
Important Tip: How to advance into checkout if you are returning to the site from a prior session with an upload
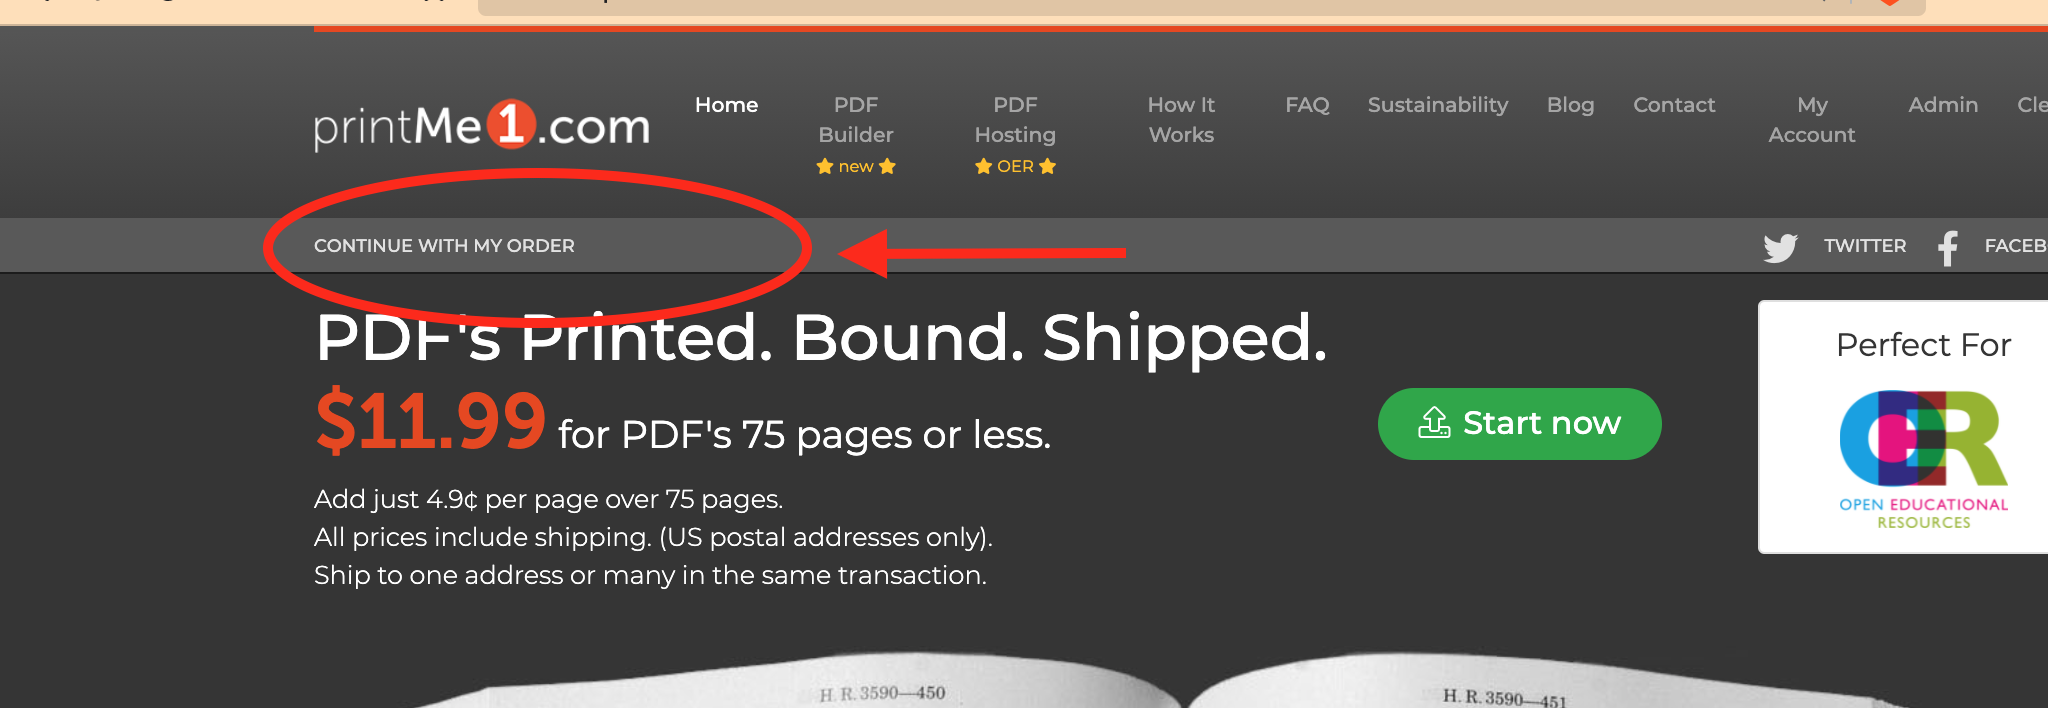
If you are returning to the site from a prior session and want to use the file you uploaded, click "Continue my previous order" under the logo. The site will not allow the same PDF to be uploaded more than once in the same session. Just click "Continue my previous order" to advance to checkout. The site will store prior activity in your browser.
Step 1: Upload PDF's
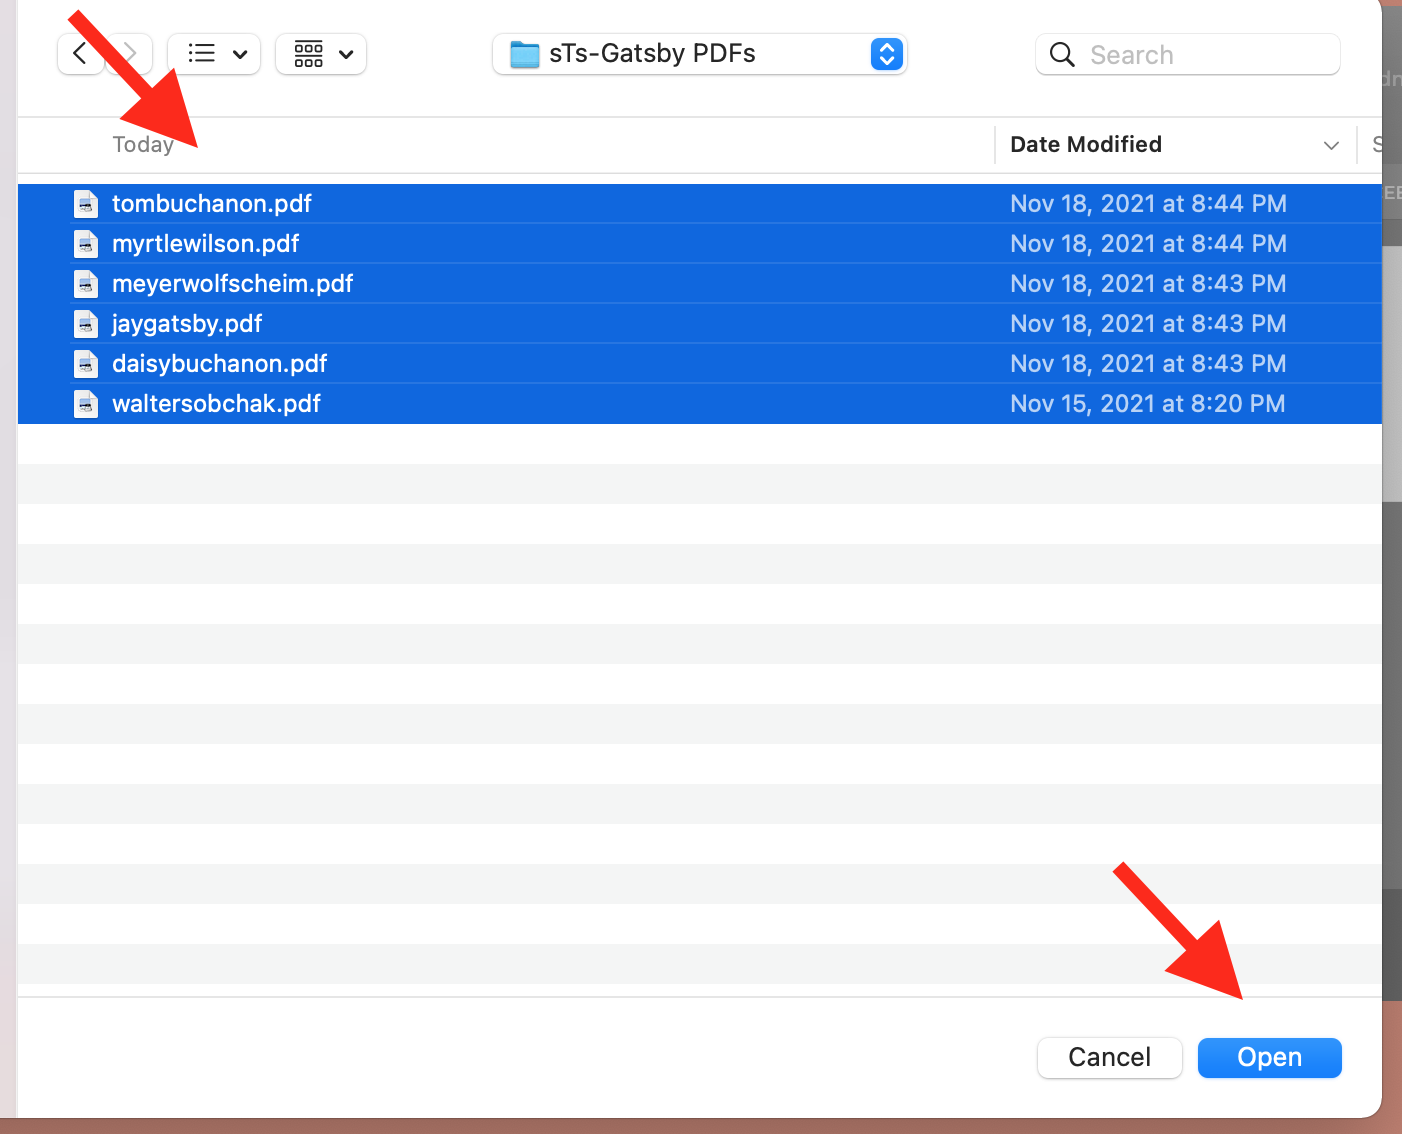
Select your PDF's. To select multiple PDF's you can use a "Command"+"Shift" to select different PDF's to upload at the same time.
For this example, we'll have six different PDF's going to six specific addresses. The order the PDF's are uploaded does not matter. The PDF's are highlighted below:
The selected PDF's are uploaded. A progress bar indicates the activity:

Step 2: Set Printing, Binding, and Copies Details or Upload more PDF's
Pro-Tip: If you have included all of these details in the CSV, then you skip this page unless you need to upload additional PDF's here.
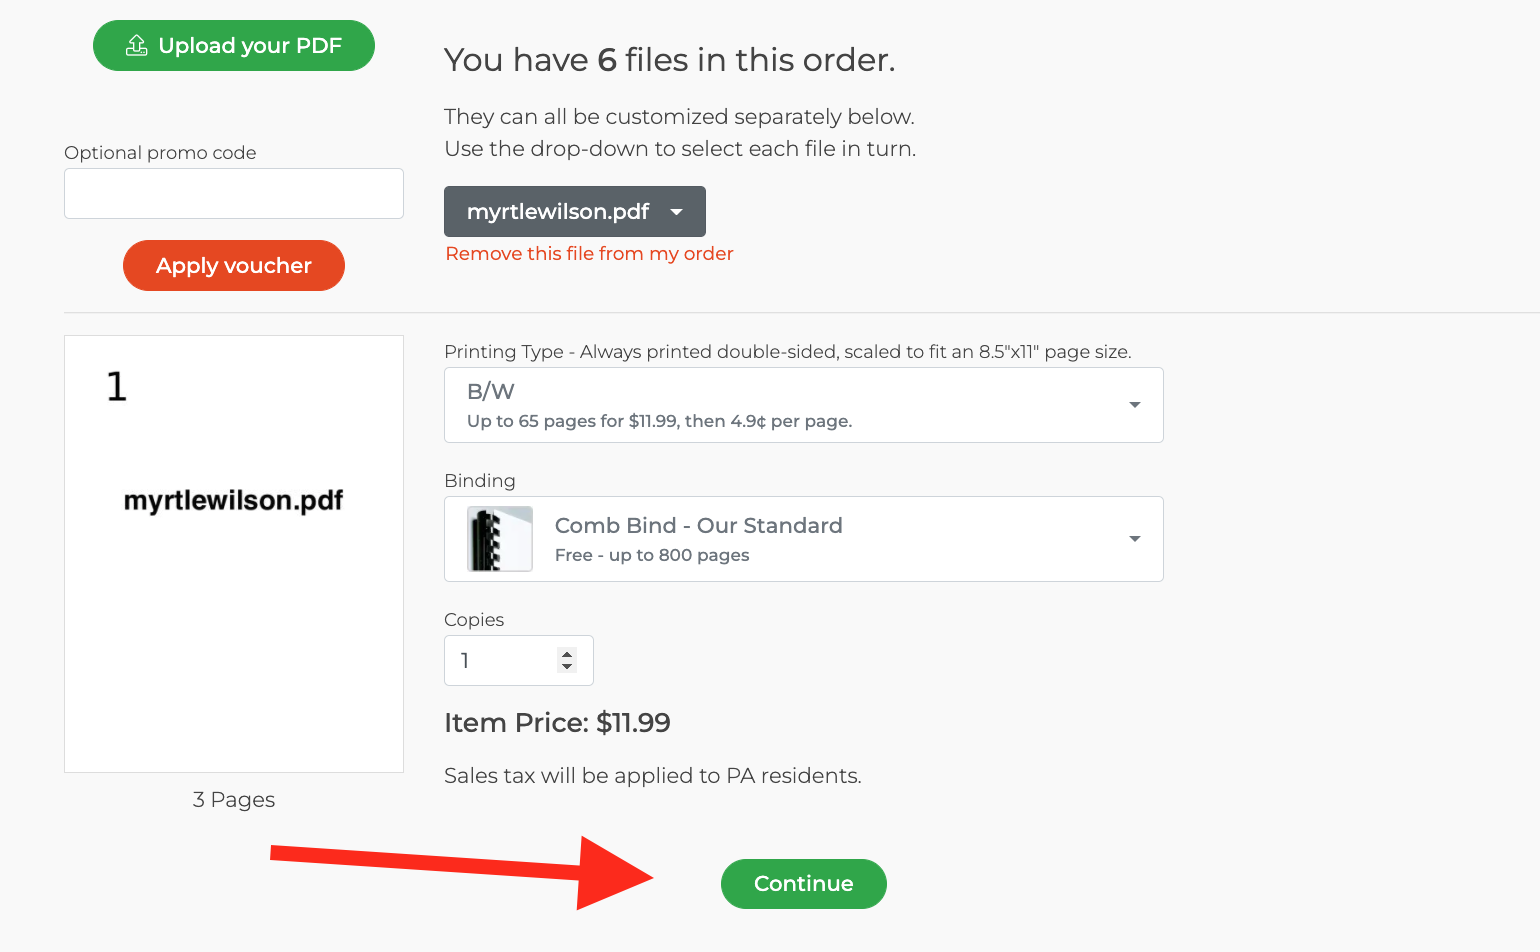
Once the PDF's are uploaded, the site displays a user interface for setting the printing, binding, and copies details. If your initial upload only partially included the PDF's you are using, you can continue uploading by clicking the "Upload" button to add more PDF's.
Because we are using the CSV to set these details, anything input here will be overridden by the CSV data.
Therefore, for this example, we will not do anything on this page, and simply click the green "Continue" button to advance:
Step 3: Billing Information
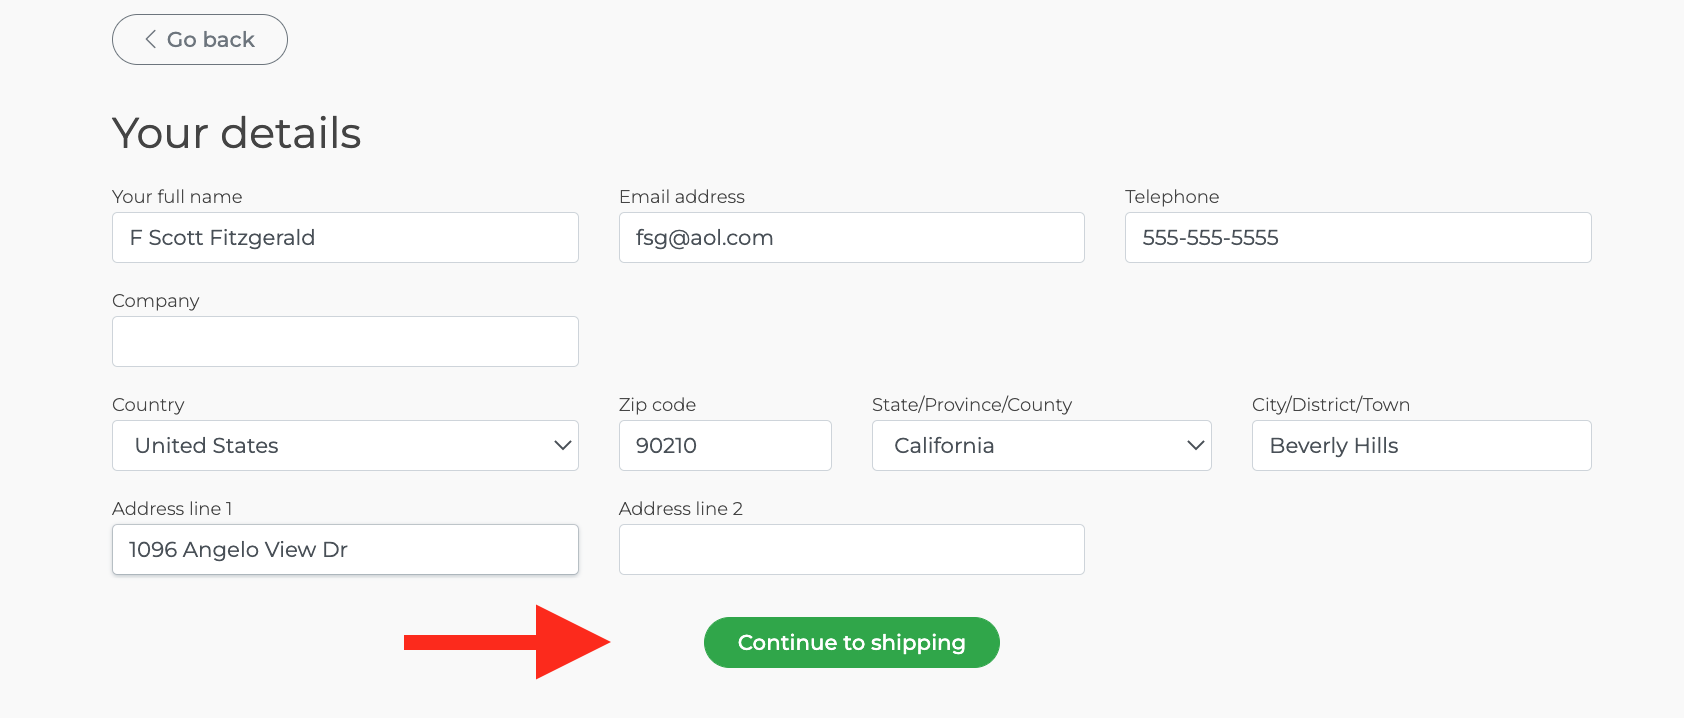
This page collects the billing address for the purchaser. This should be the address for the credit card that will be used to pay for the order. Paypal does not work with the Specific to Specific™ feature.
Click "Continue to shipping" to advance.
Step 4: Shipping
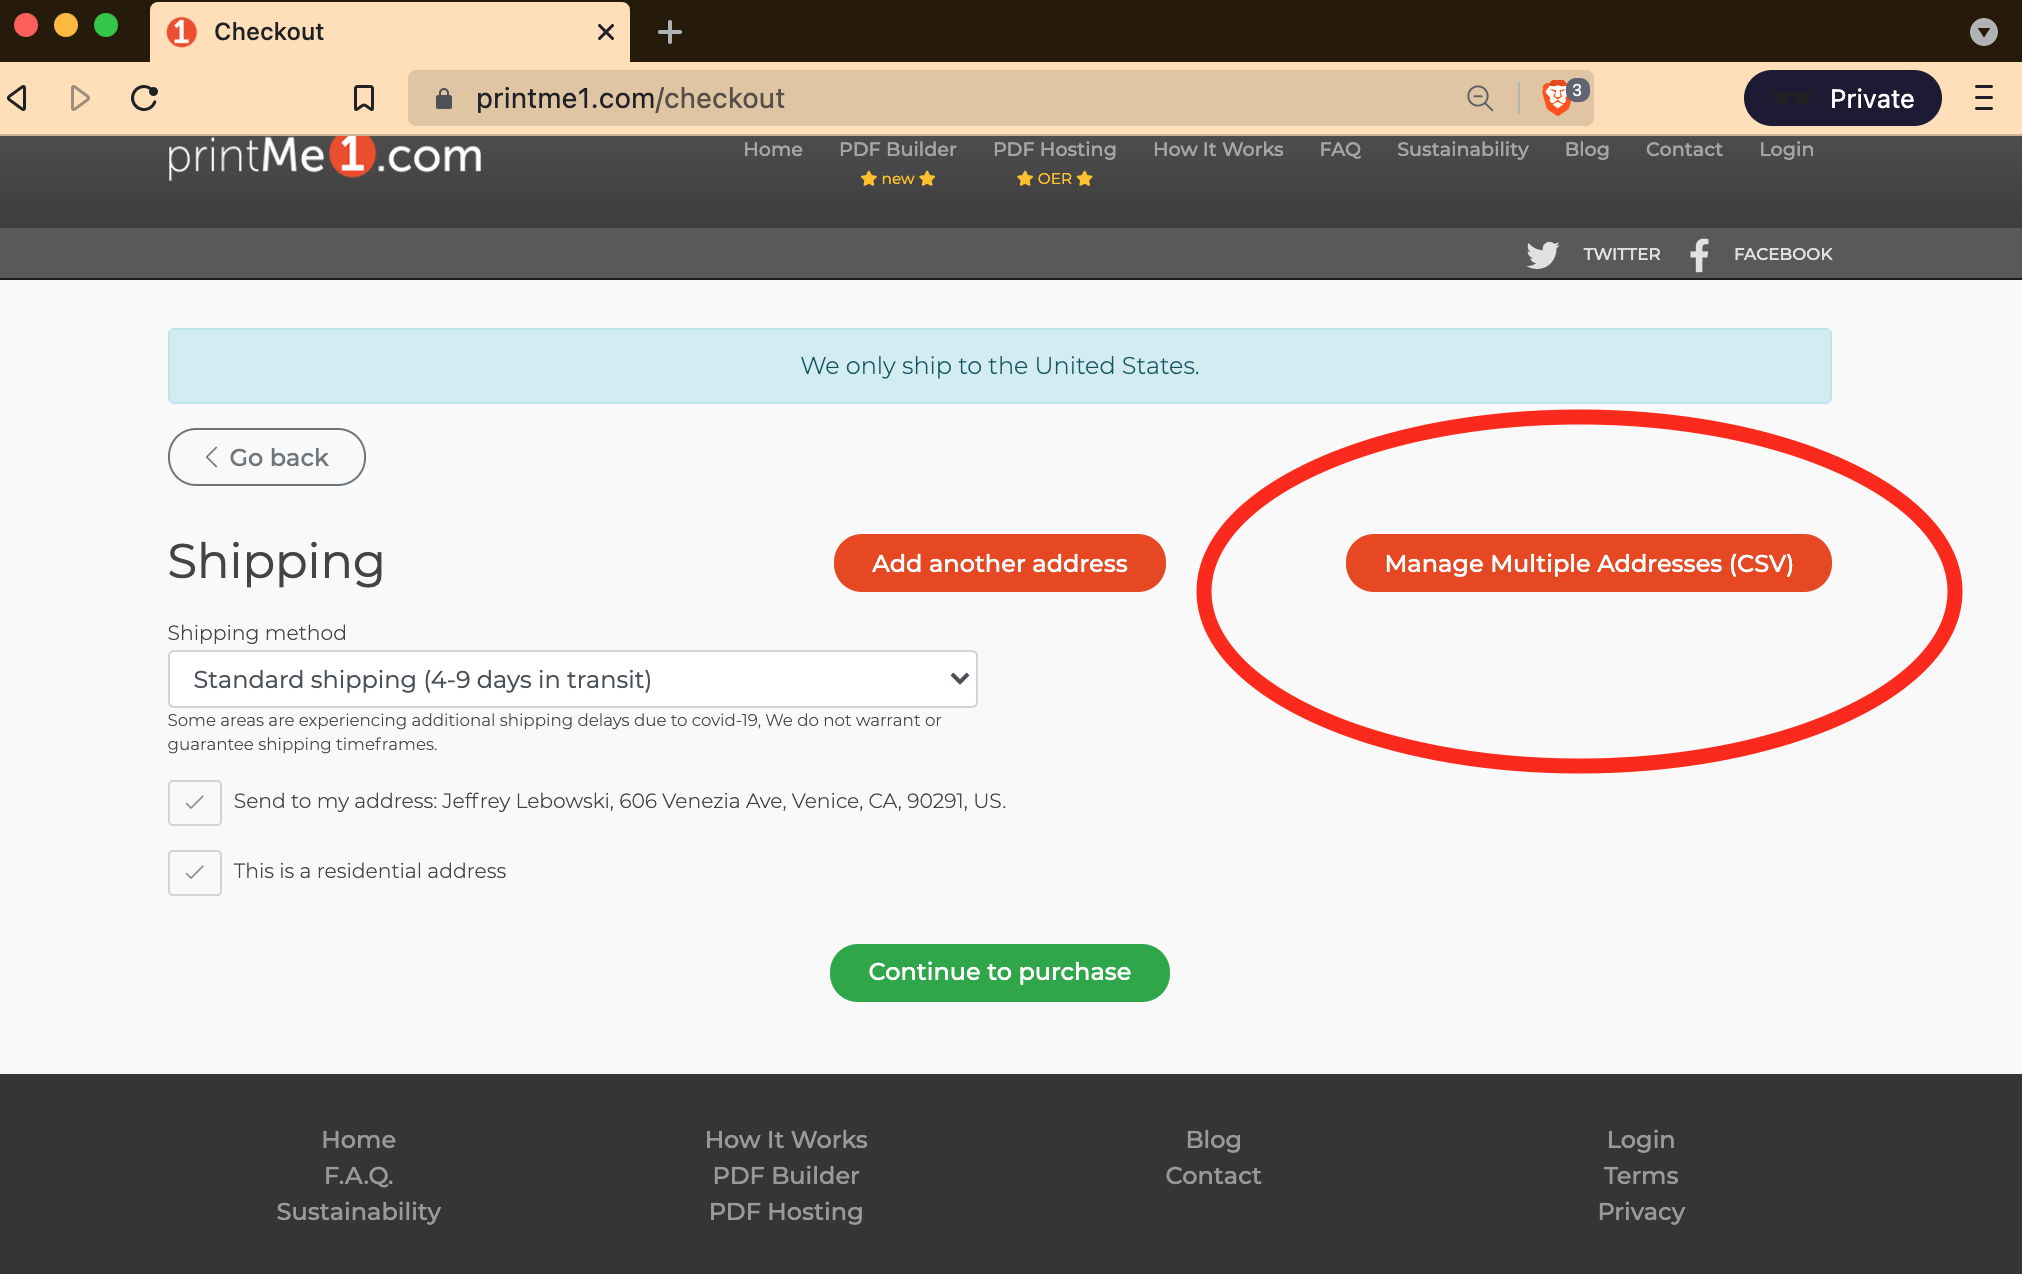
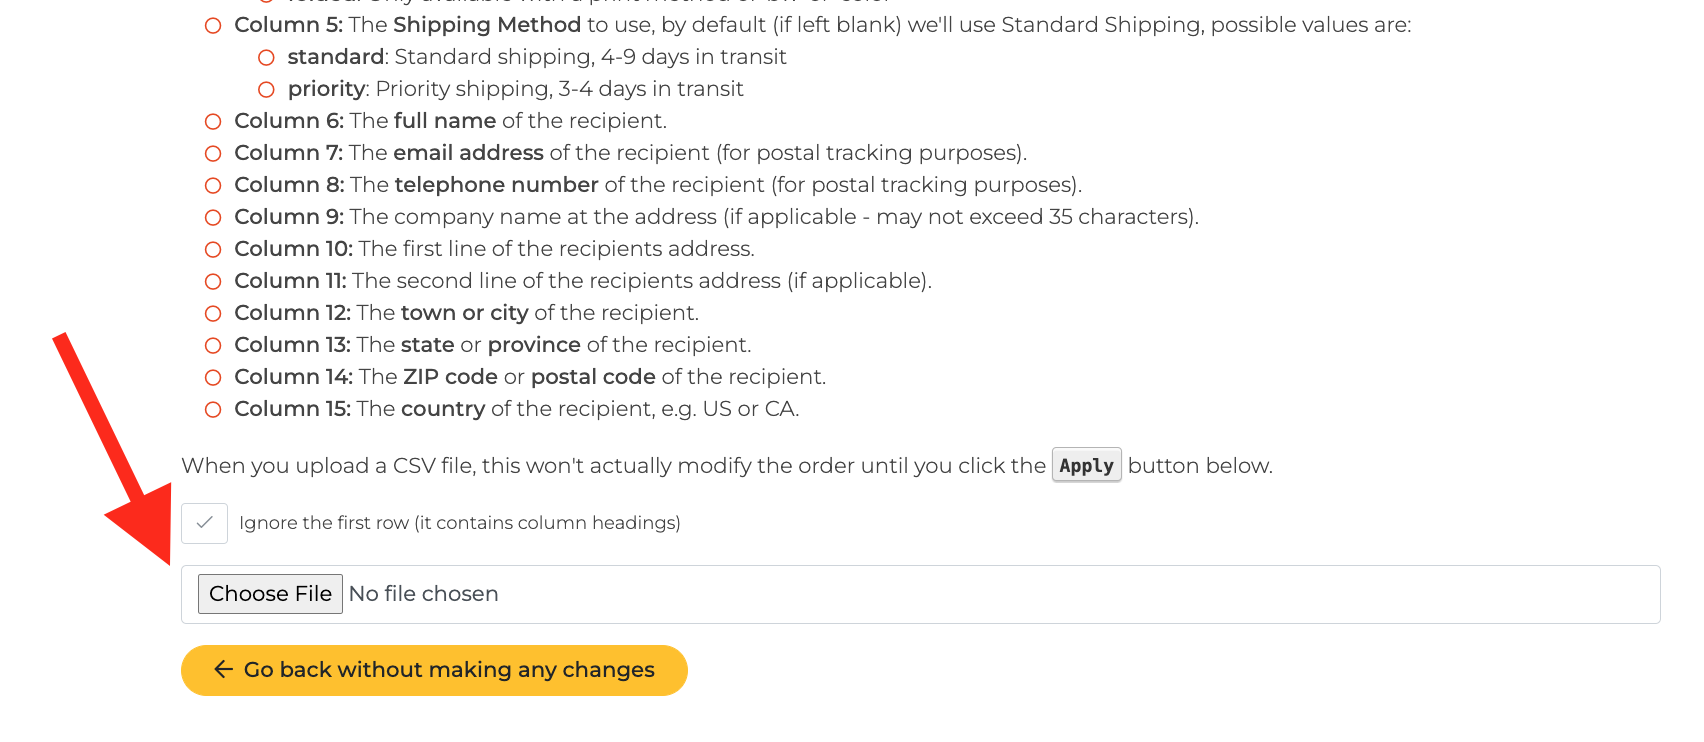
Click the "Manage Multiple Addresses (CSV)" button.
Step 5: Attach CSV
This opens up a page that displays the CSV instructions (same as in the Spreadsheet Formatting section above) and an upload button to use to attach your CSV file.
Click the "Choose File" button and attach your CSV.
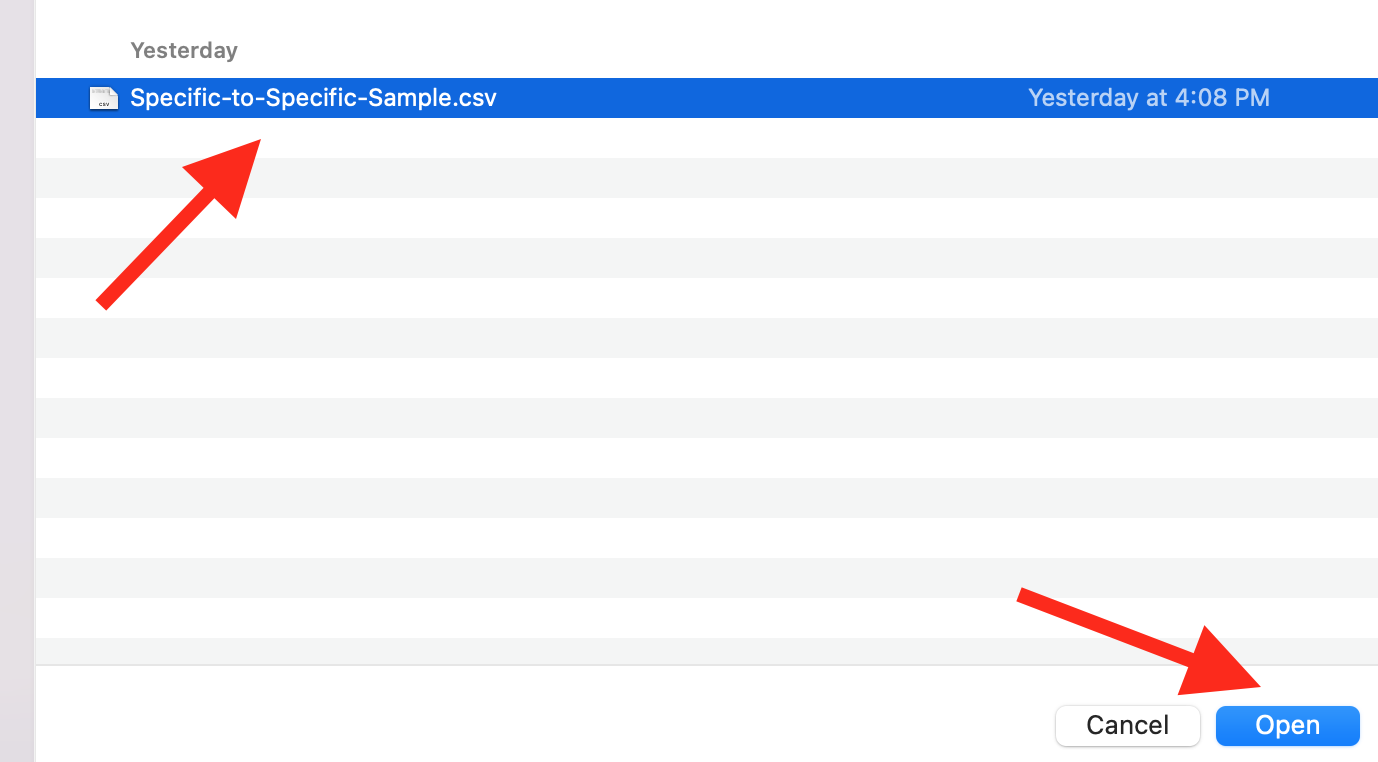
Find and select your CSV file and click "Done" to upload it.
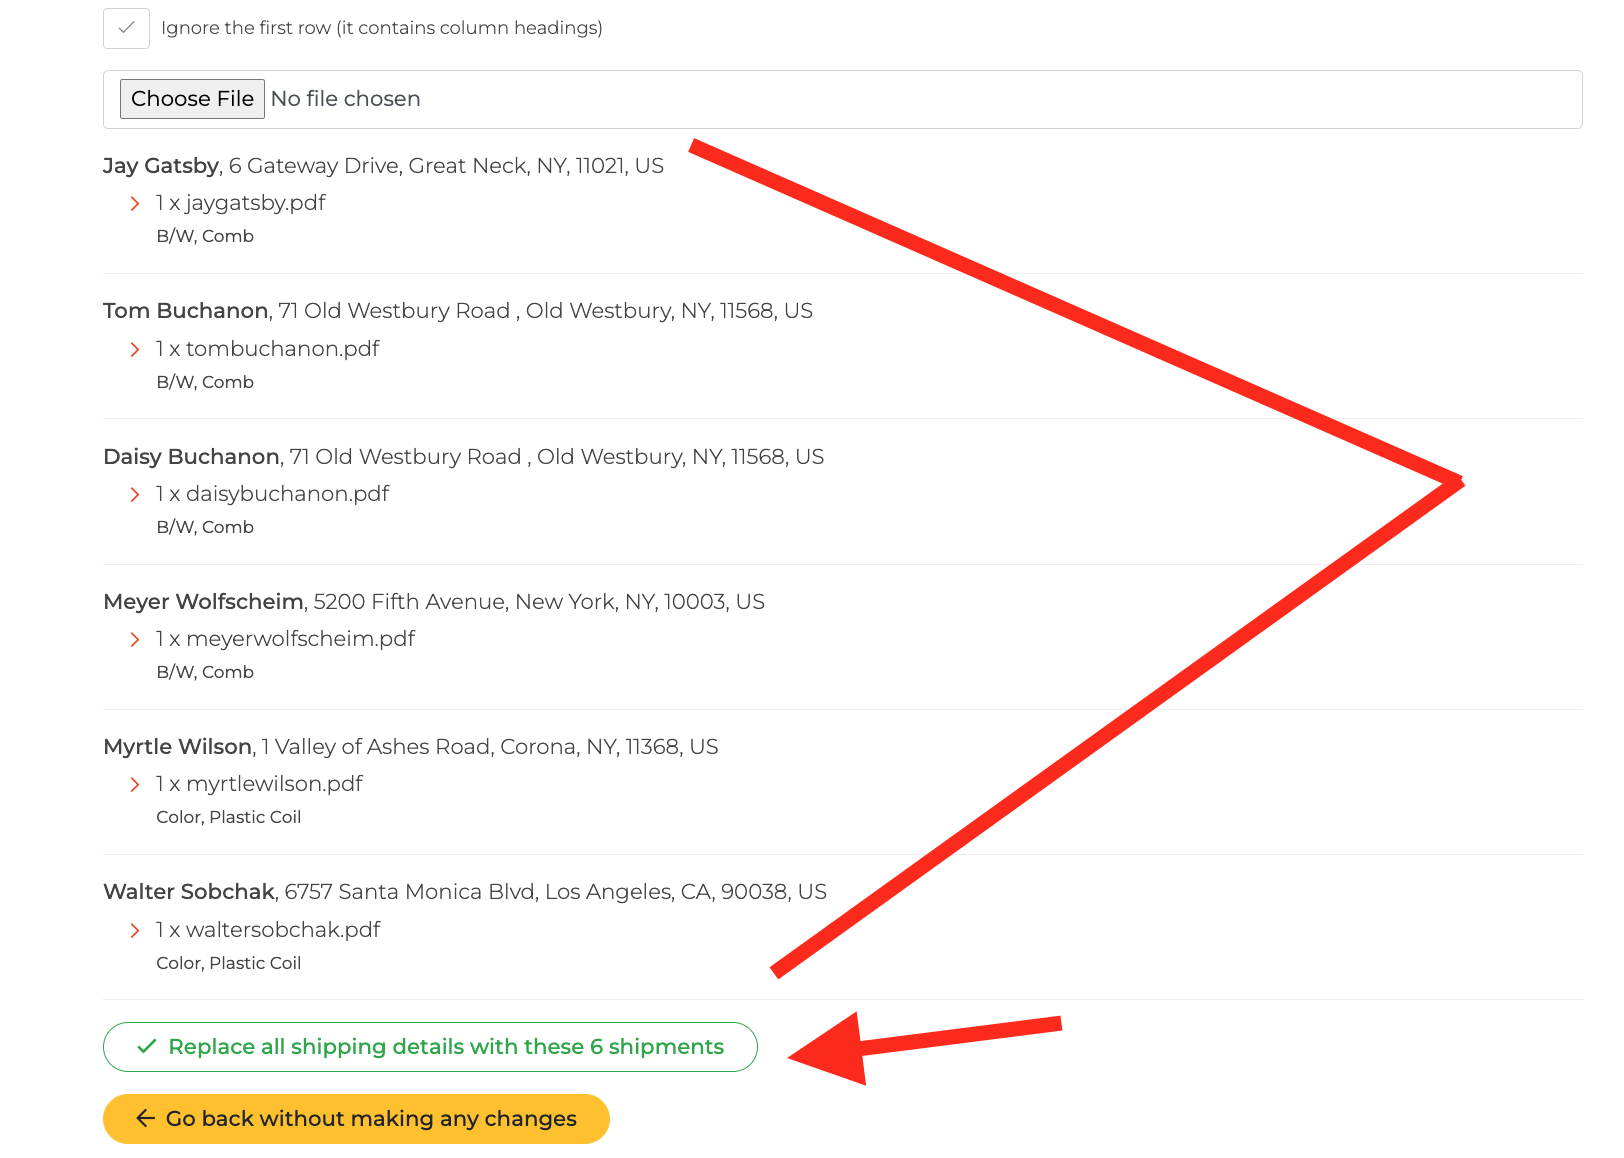
This will upload, and automatically display the Recipients, address, and the prints they will receive. In our example, we had 6 recipients, each receiving a different print. These were all collected by the site from the CSV and displayed below.
If there is an error in the CSV or something needs to be changed, you can make changes to your CSV at this time and re-upload the CSV by clicking "Go back without making any changes".
If everything is correct, click the green button "Replace all shipping details with these 6 shipments" to apply the CSV and return to checkout.
Note: If you have a list with 100 or more addresses, this may hang for a minute while the site is calculating everything.
Step 6: Review and Accept CSV Details
After clicking the "Replace.." button, the CSV addresses overwrite any prior addresses and then returns you to shipping.
Step 7: Confirm shipment details
The 1st recipient appears in the gray shipping dropdown, and their shipping details appear in the fields. Click the gray menu to open up the list of shipments in your order. Choose any recipient to bring it forward to make changes if necessary. Click "Continue to Purchase" to accept each change.
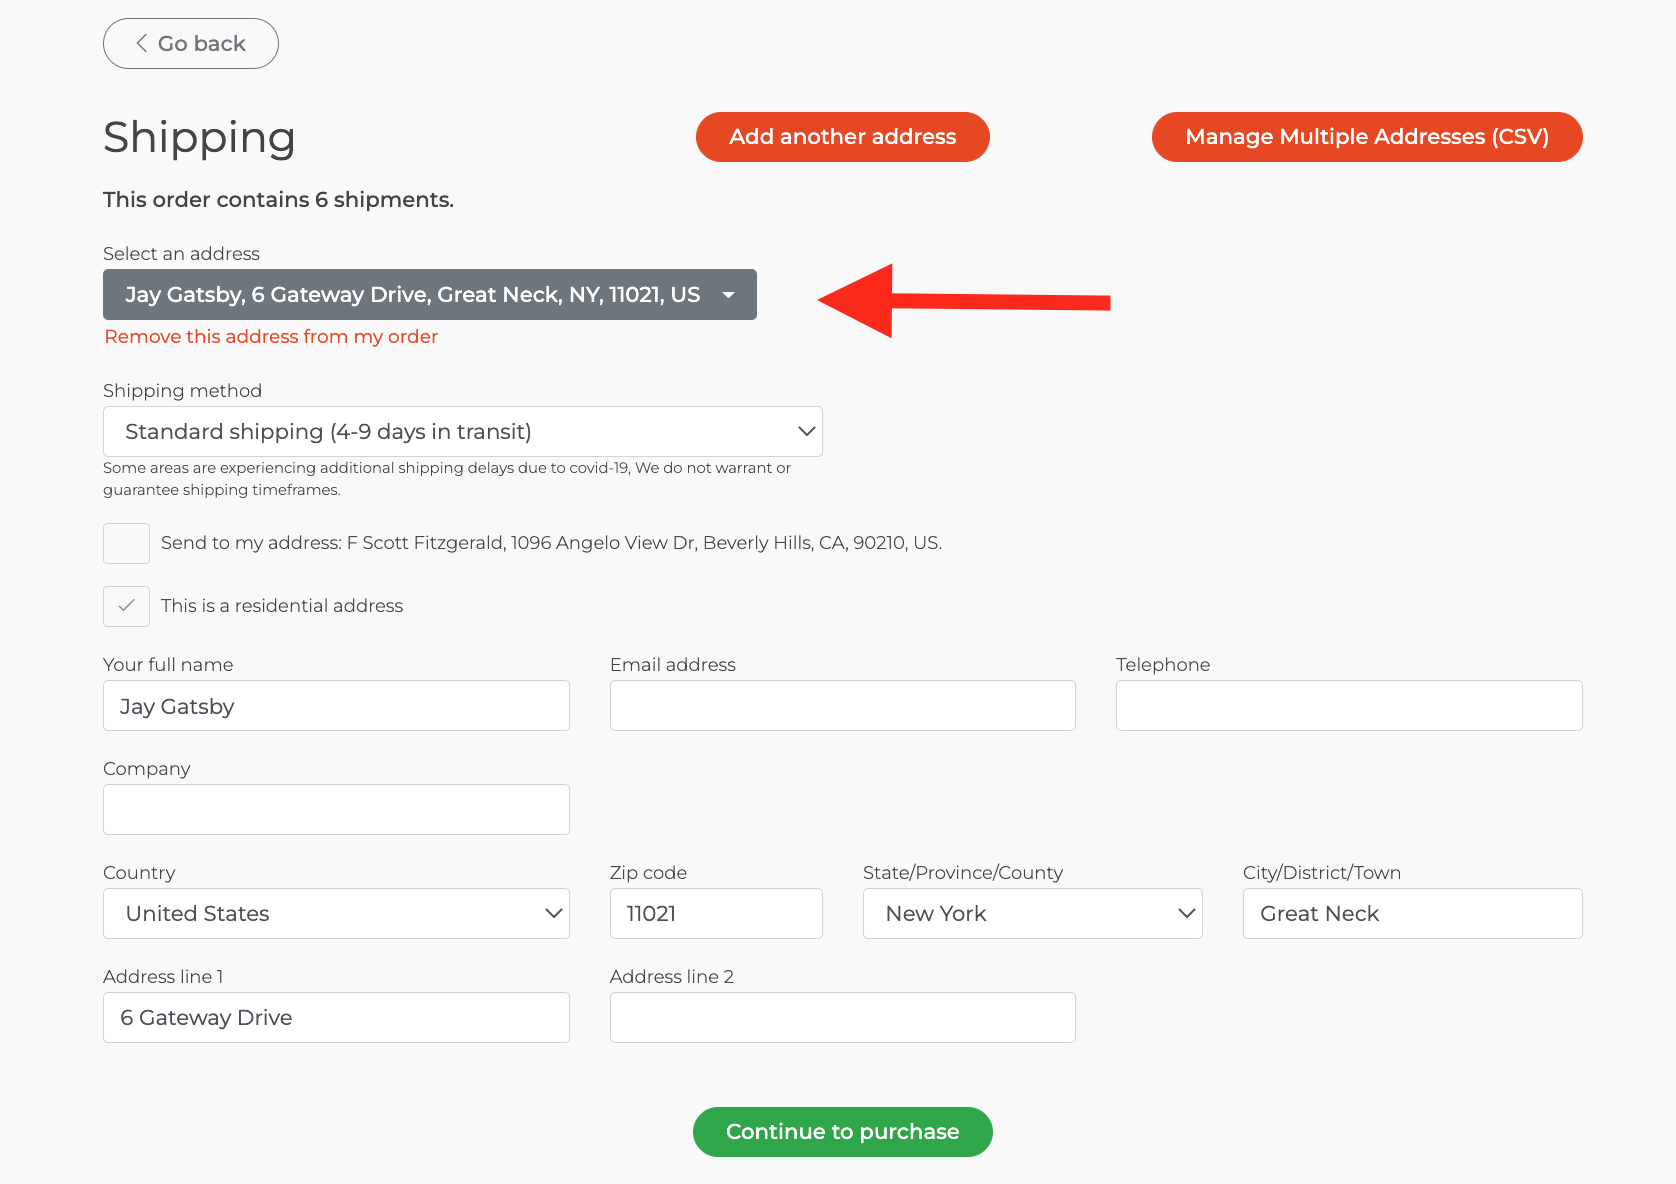
Changes to any recipient's address can be made by clicking the dropdown and toggling to the recipient you want to change.
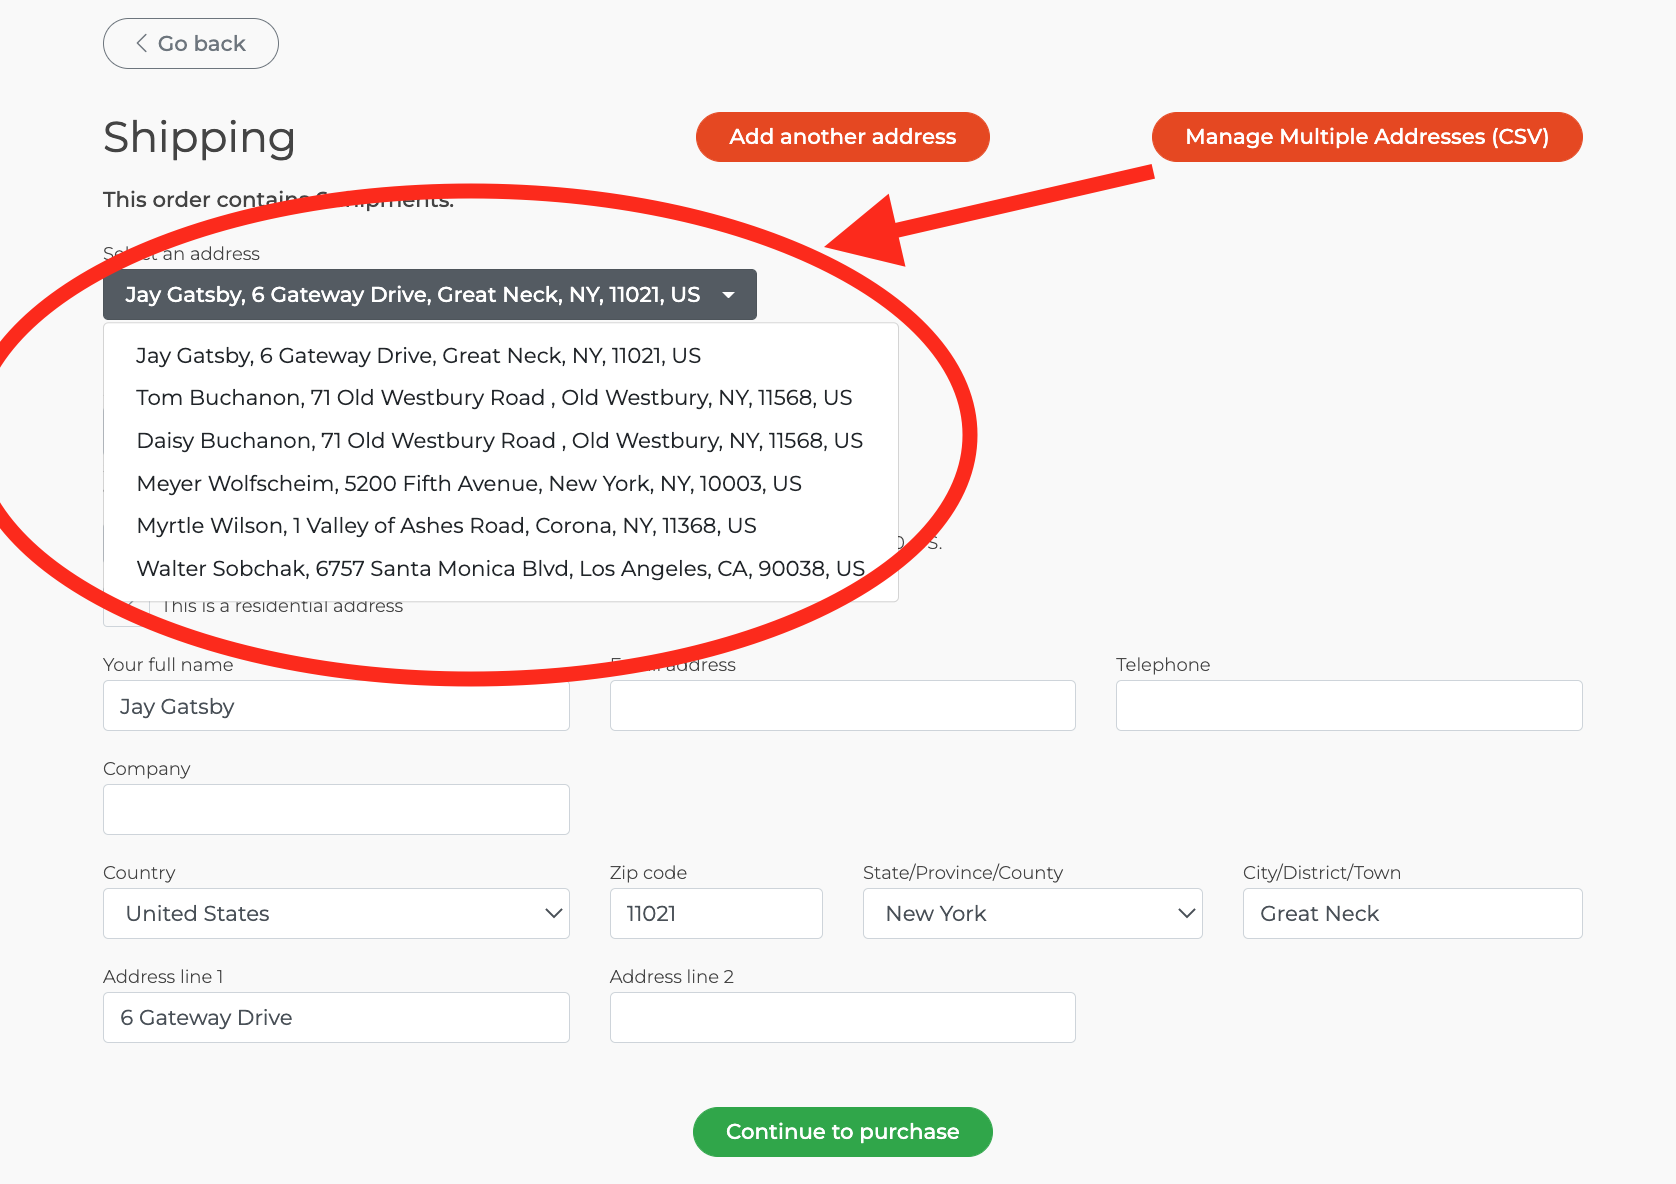
If everything in shipping looks good, congrats! You just uploaded a CSV of addresses.
Click the green "Continue to purchase" button to advance.
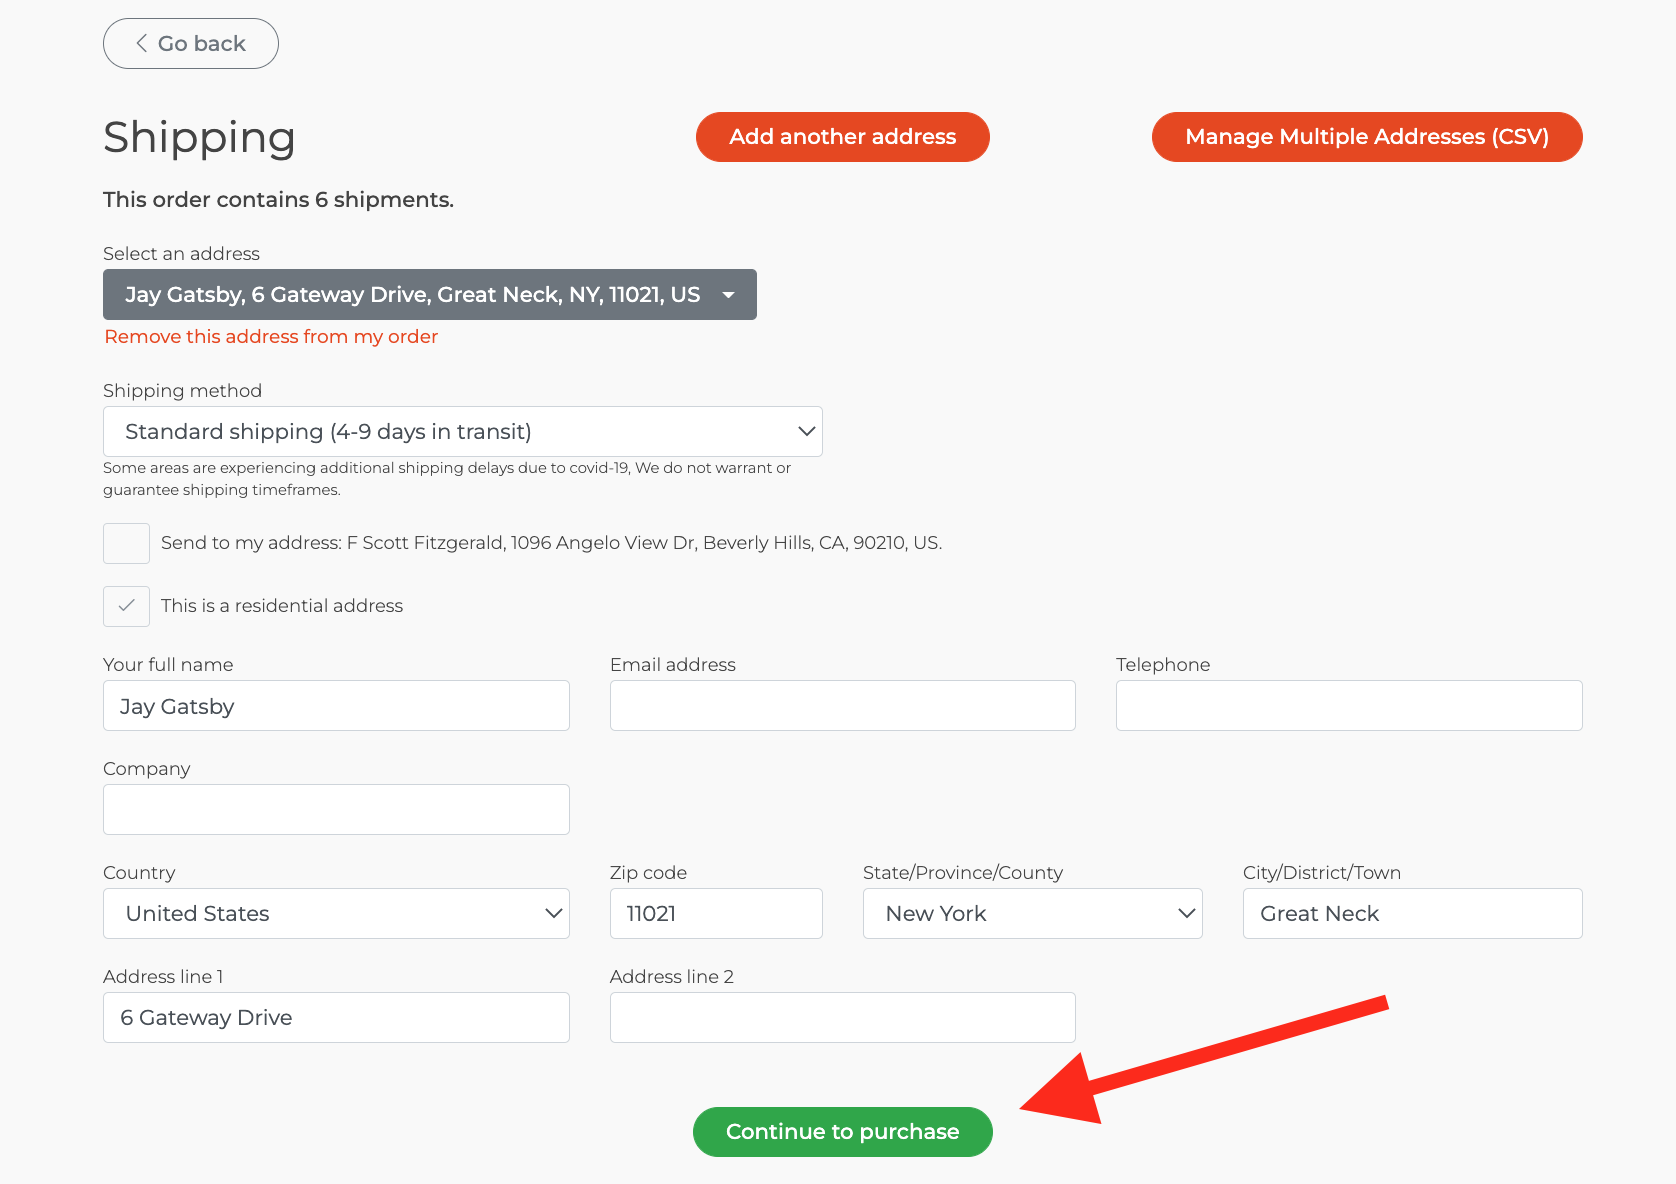
Pro Tips:
If you need to upload more PDF files to your order, go back and do that before uploading the CSV.
When you upload a CSV file, it won't actually modify the order until you click the green button to Apply the CSV.
If something isn't right with the CSV, you can correct the CSV and re-upload it.
The number of recipients is totaled at the top of this page. Make sure it is correct.
Step 8: Payment
On this page, the order details are presented with the total.
The order is listed per shipment, so you see the shipping method, recipient & address, then the prints that address will receive. There is a quantity button with each filename that can be used to change a quantity for any recipient before paying.
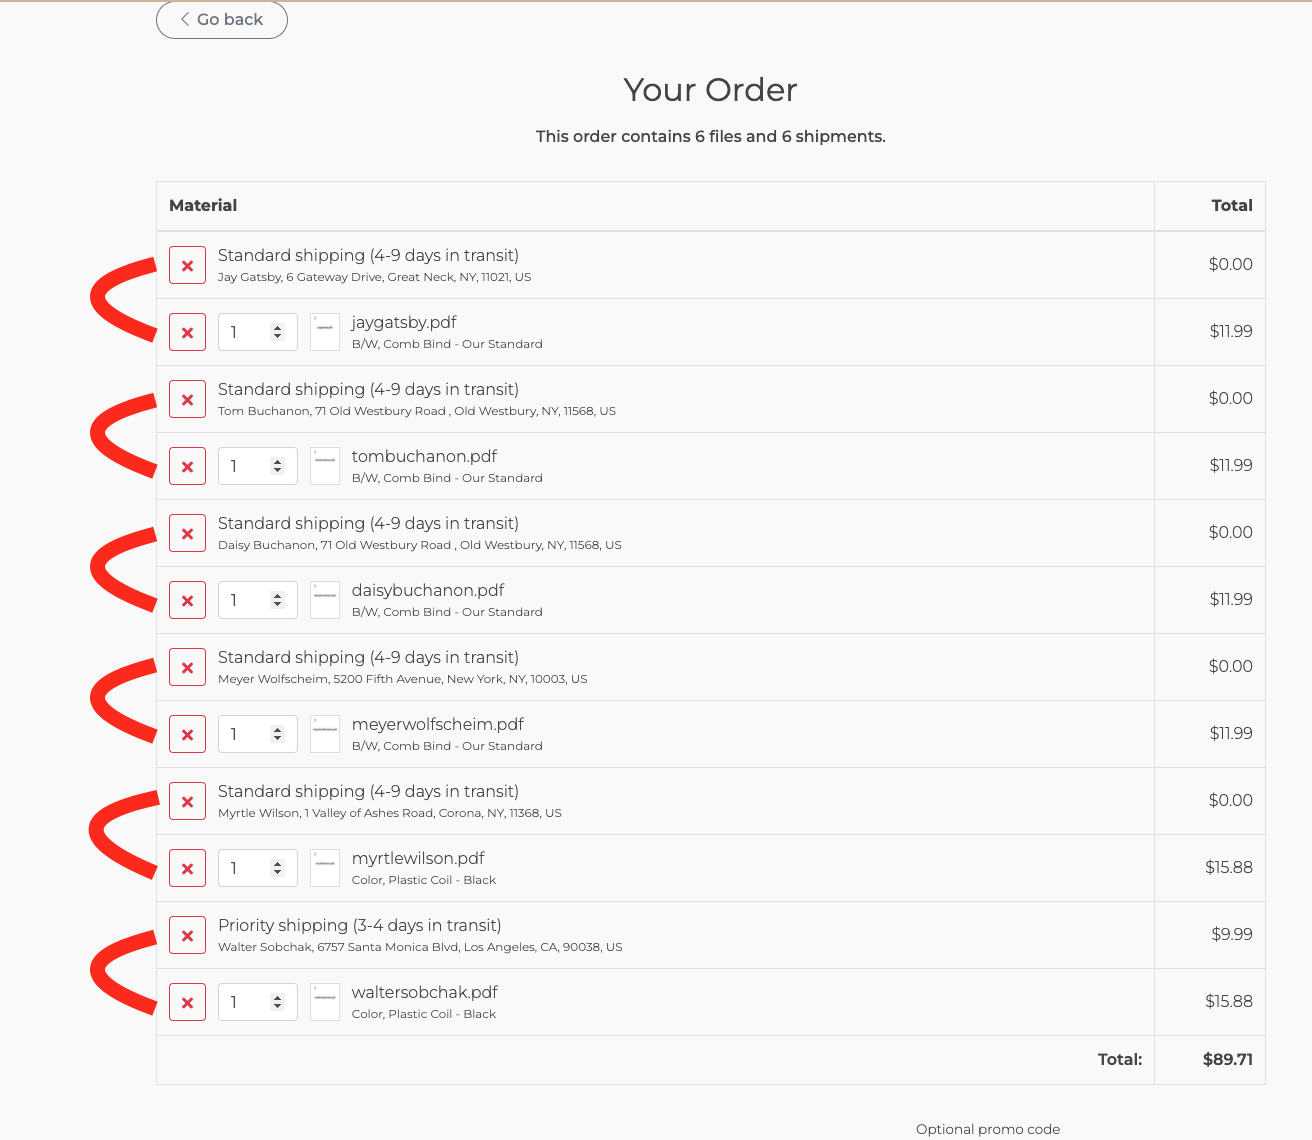
This list may be very long. Scroll to review each item. When you reach the end of the list, the payment button will be found. Input your credit card or purchasing card number, and click "Complete Order".
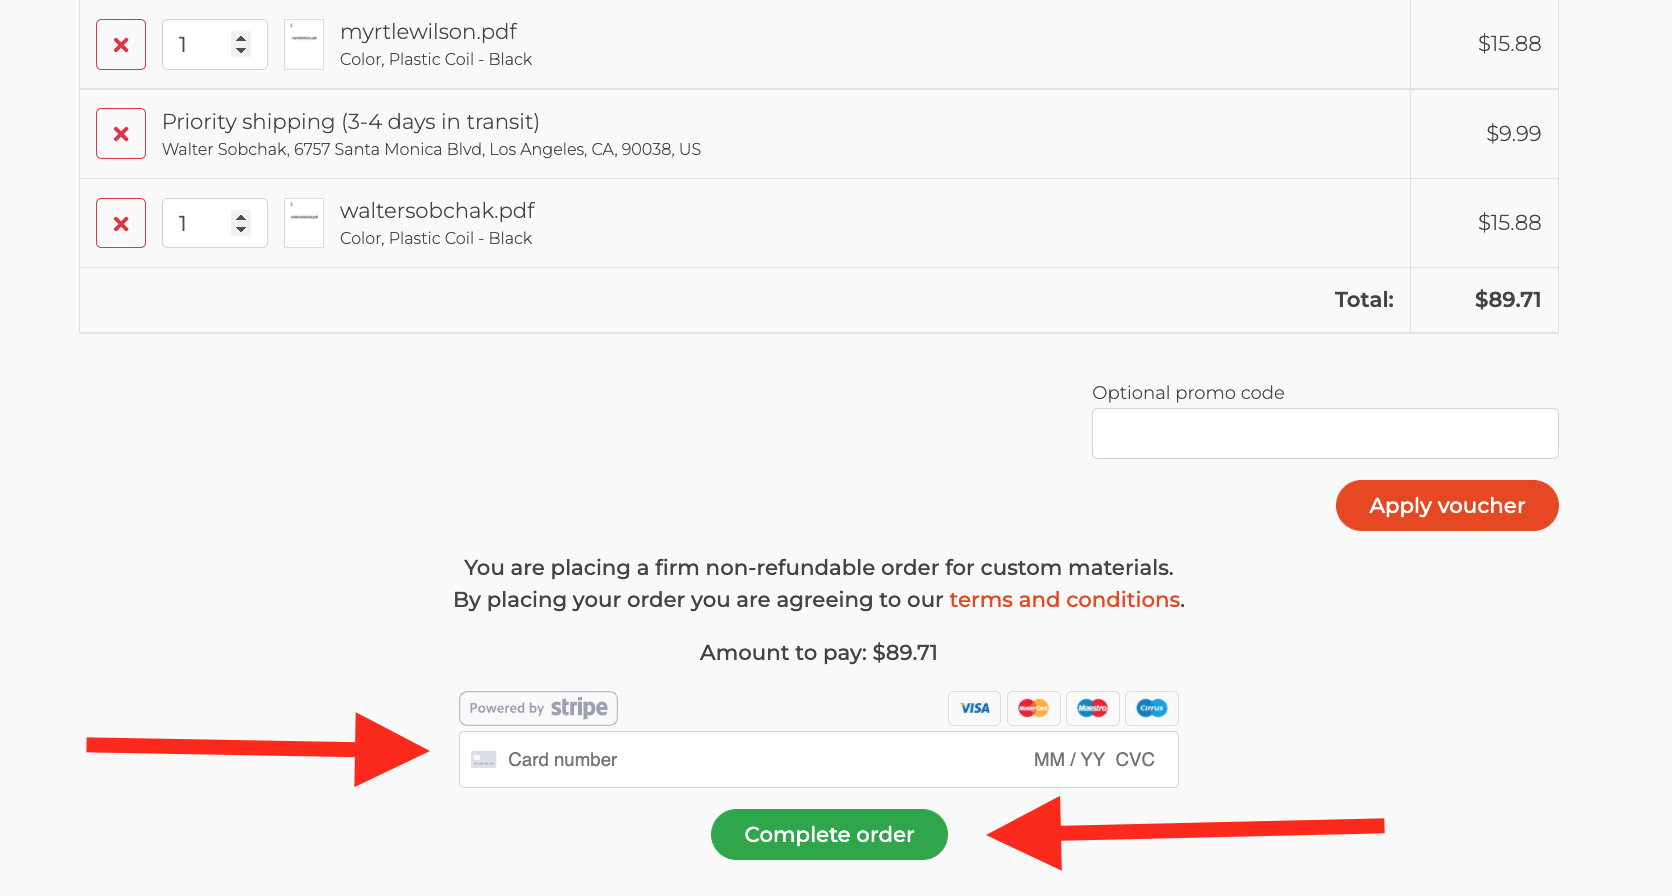
Done! You've just finished inputting a Specific prints to Specific recipients order on printMe1.com
Tips and Troubleshooting
Resuming an order in progress
If you started an order and close your window or otherwise are back at the home page, you can proceed to your uploaded PDF's by clicking the link "Continue with my order", found under the printMe1.com logo.

Removing PDF's from an Order
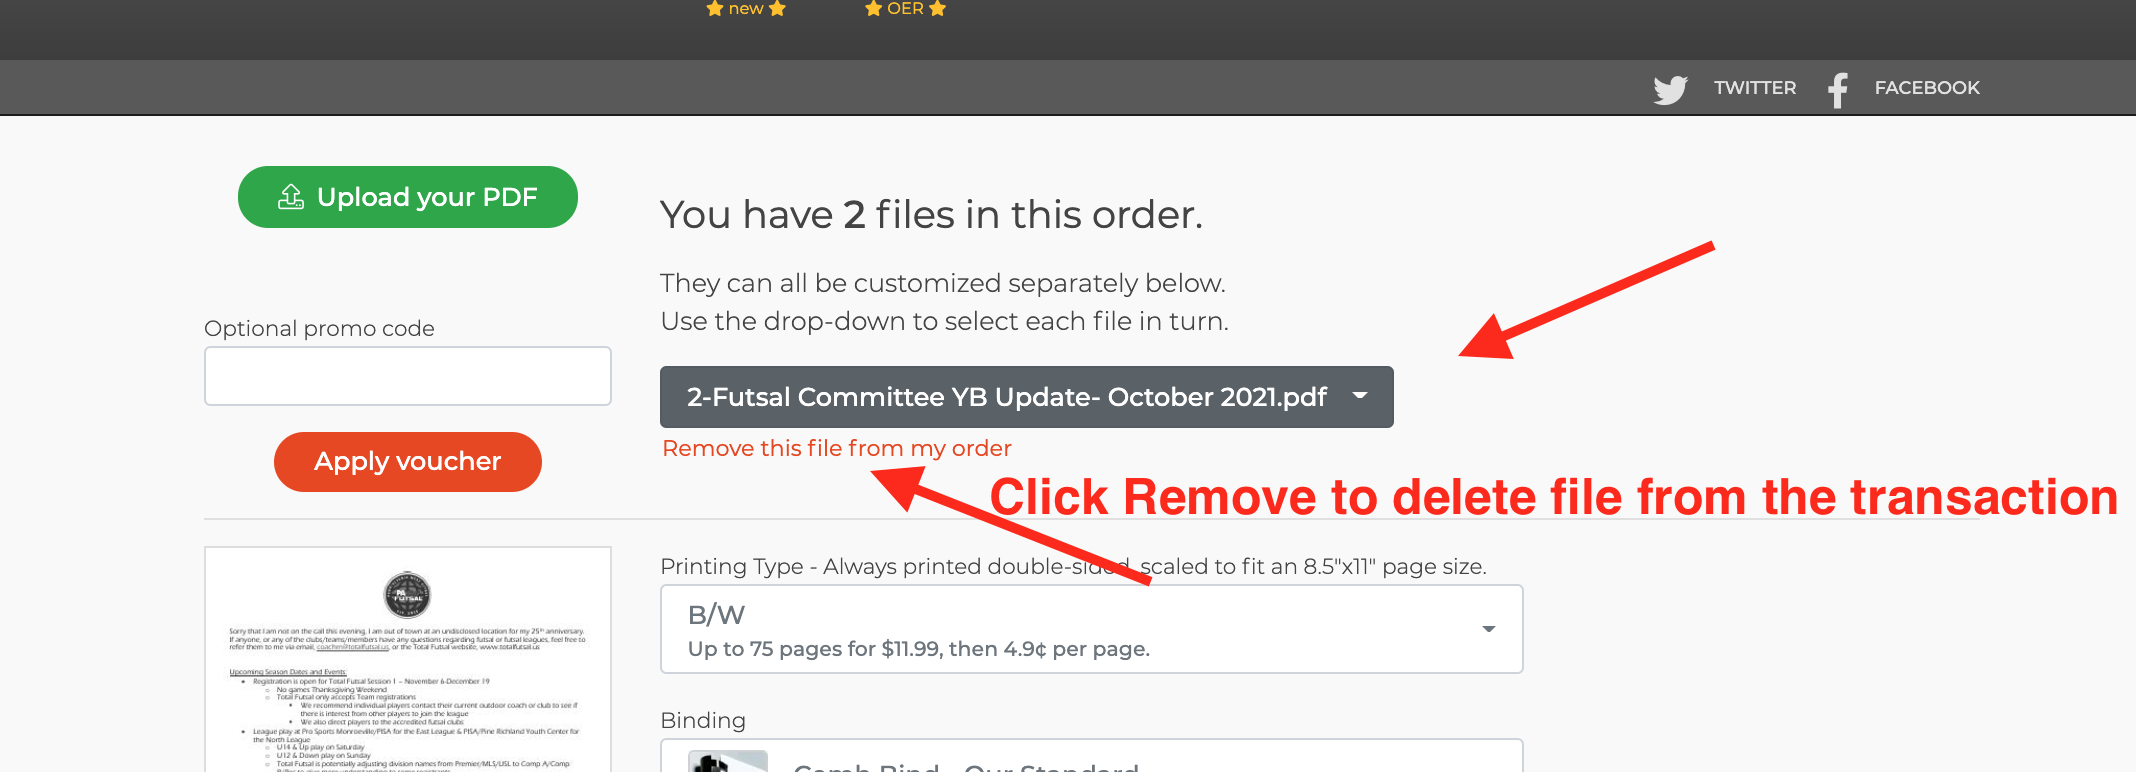
If you have uploaded multiple PDF's and want to remove some of them without starting over, here's how to do that.
Once you have more than one PDF, a dropdown menu is created at the PDF filename area to use to toggle through the PDF's. To remove a PDF, use the dropdown to select it, then click the orange link "Remove this PDF from my order".
Not Generating any shipments after uploading a CSV
As soon as you upload your CSV, the names and addresses should appear almost immediately. If they are incorrect, error notices will appear. That means you should stop and check your CSV. Some common issues:
-The CSV should have a header row, then the data. Or, you can just have the data but be sure to deselect the box "My CSV has a header row". No other cells should be there.
-This feature only works with US Addresses. If you have addresses to other countries they will cause an error. Remove those. We can assist with them manually, after the CSV order is placed.
-If you have an issue with the CSV and need some direction, please contact us. We will reply back and ask for the CSV.
Not generating any print charges after uploading a CSV
A print needs an address to send to. If there is an error in the CSV formatting, you'll see no charge, or unexpected amounts. See the above section to correct it.
Conclusion
printMe1.com's ability to accept order details via a CSV file allows you to create a single transaction that sends prints of specific PDF's to many specific recipients. It's powerful yet also extremely easy to use.
Create your CSV first, be sure to include the filename to be printed for each recipient along with quantity, printing and binding details and each recipient's address, then upload the PDF's, and checkout.
Our site automatically creates an individual print order from the CSV details for each PDF and calculates the total printing, binding, and shipping charges based on the number of printing, binding, and shipping details for each recipient in the CSV.
Once payment is completed, the site processes a print job for each recipient as if they placed their own individual orders, and printing begins soon after the order is placed. The pricing is our standard pricing as if each recipient placed their order individually. Most Specific to Specific™ jobs ship in under 48 business hours just like any other job, although for lists over 100 users or prints, please allow an extra 24 hours per 75 additional recipients or prints.
One additional built in specialty for this feature is the ability to access stapling and folding as finishing options for batch printing low page count PDF's. We cover that here.
A more simpler variation of a Specific to Specific™ order is a One to Many,™ where one PDF or set of PDF's goes out to your CSV list. For this type, the PDF filenames do not need to be included because each recipient is receiving the same print or set of prints. Read our How To guide for a One to Many™ order here.
If you have questions or need assistance with this feature, please contact us.
"Specific to Specific", "One to Many" and "Simple Print Service" are trademarks of egrafa, inc. D/B/A printMe1.com


![Single-Sided PDF Printing [Updated 4-8-24]](http://public/images/530/blog/upload/25b15134-header.jpeg)


![PDF's of enacted US Laws, Federal Court, and other US publications reformatted for Easy-to-Read Printing in US Letter Formats- Free downloads [Updated 8/15/25]](http://public/images/530/blog/upload/5aed875-abraham-lincoln-memorial-1920x1080.jpg)


